Appearance
Buildroot
We will be using buildroot to generate the filesystem (/bin, /etc, ...) for our embedded system. In buildroot, we have the option to configure which software we want on the device. For example, if we want to access the HPS via ssh, we will have to add an ssh server in buildroot to be compiled and added to the filesystem and executed at boot.
Buildroot Wikipedia
Buildroot is a set of Makefiles and patches that simplify and automate the process of building a complete and bootable Linux environment for an embedded system, using cross-compilation to allow building for multiple target platforms on a single Linux-based development system. Buildroot can automatically build the required cross-compilation toolchain, create a root file system, compile a Linux kernel image, and generate a boot loader for the targeted embedded system, or perform any independent combination of these steps. For example, an already installed cross-compilation toolchain can be used independently, while Buildroot only creates the root file system.
Video
::: Buildroot is an alternative to another well-known project: Yocto. The following video features two developers, one from each project, comparing the two tools:
INFO
Yocto is establishing itself as the industry standard tool, taking over from buildroot. The choice for buildroot in the elective is due to the ease of creating a system; Yocto is more complex and full of terminologies. In this elective, we will work with buildroot, but for those who want to delve into/specialize in the topic, learning Yocto is a must.
Video
:::
Getting Started
Recommended Reading
Buildroot has a configuration tool similar to the Linux kernel (menuconfig / nconfig). We will use it to configure the filesystem and decide which programs will be compiled and inserted into /root/. Remember that we already have a toolchain (which we used to compile the kernel) configured in .bashrc, we will use it for the compilation of all the programs that we will load on the embedded system.
Buildroot has the option to download the toolchain (it can also compile the kernel and generate uboot, it is a very comprehensive tool), but this time we will use what we already have (to maintain compatibility).
Exercise
First, we need to download buildroot:
bash
$ git clone https://github.com/buildroot/buildroot
$ cd buildroot/
Configuring
Now we need to configure the buildroot.
Exercise
In the recently cloned buildroot folder, run the following command:
bash
$ make ARCH=arm menuconfigIf you encounter an error, you may need to install
libncurses-devvia apt.
This will open a configuration screen:
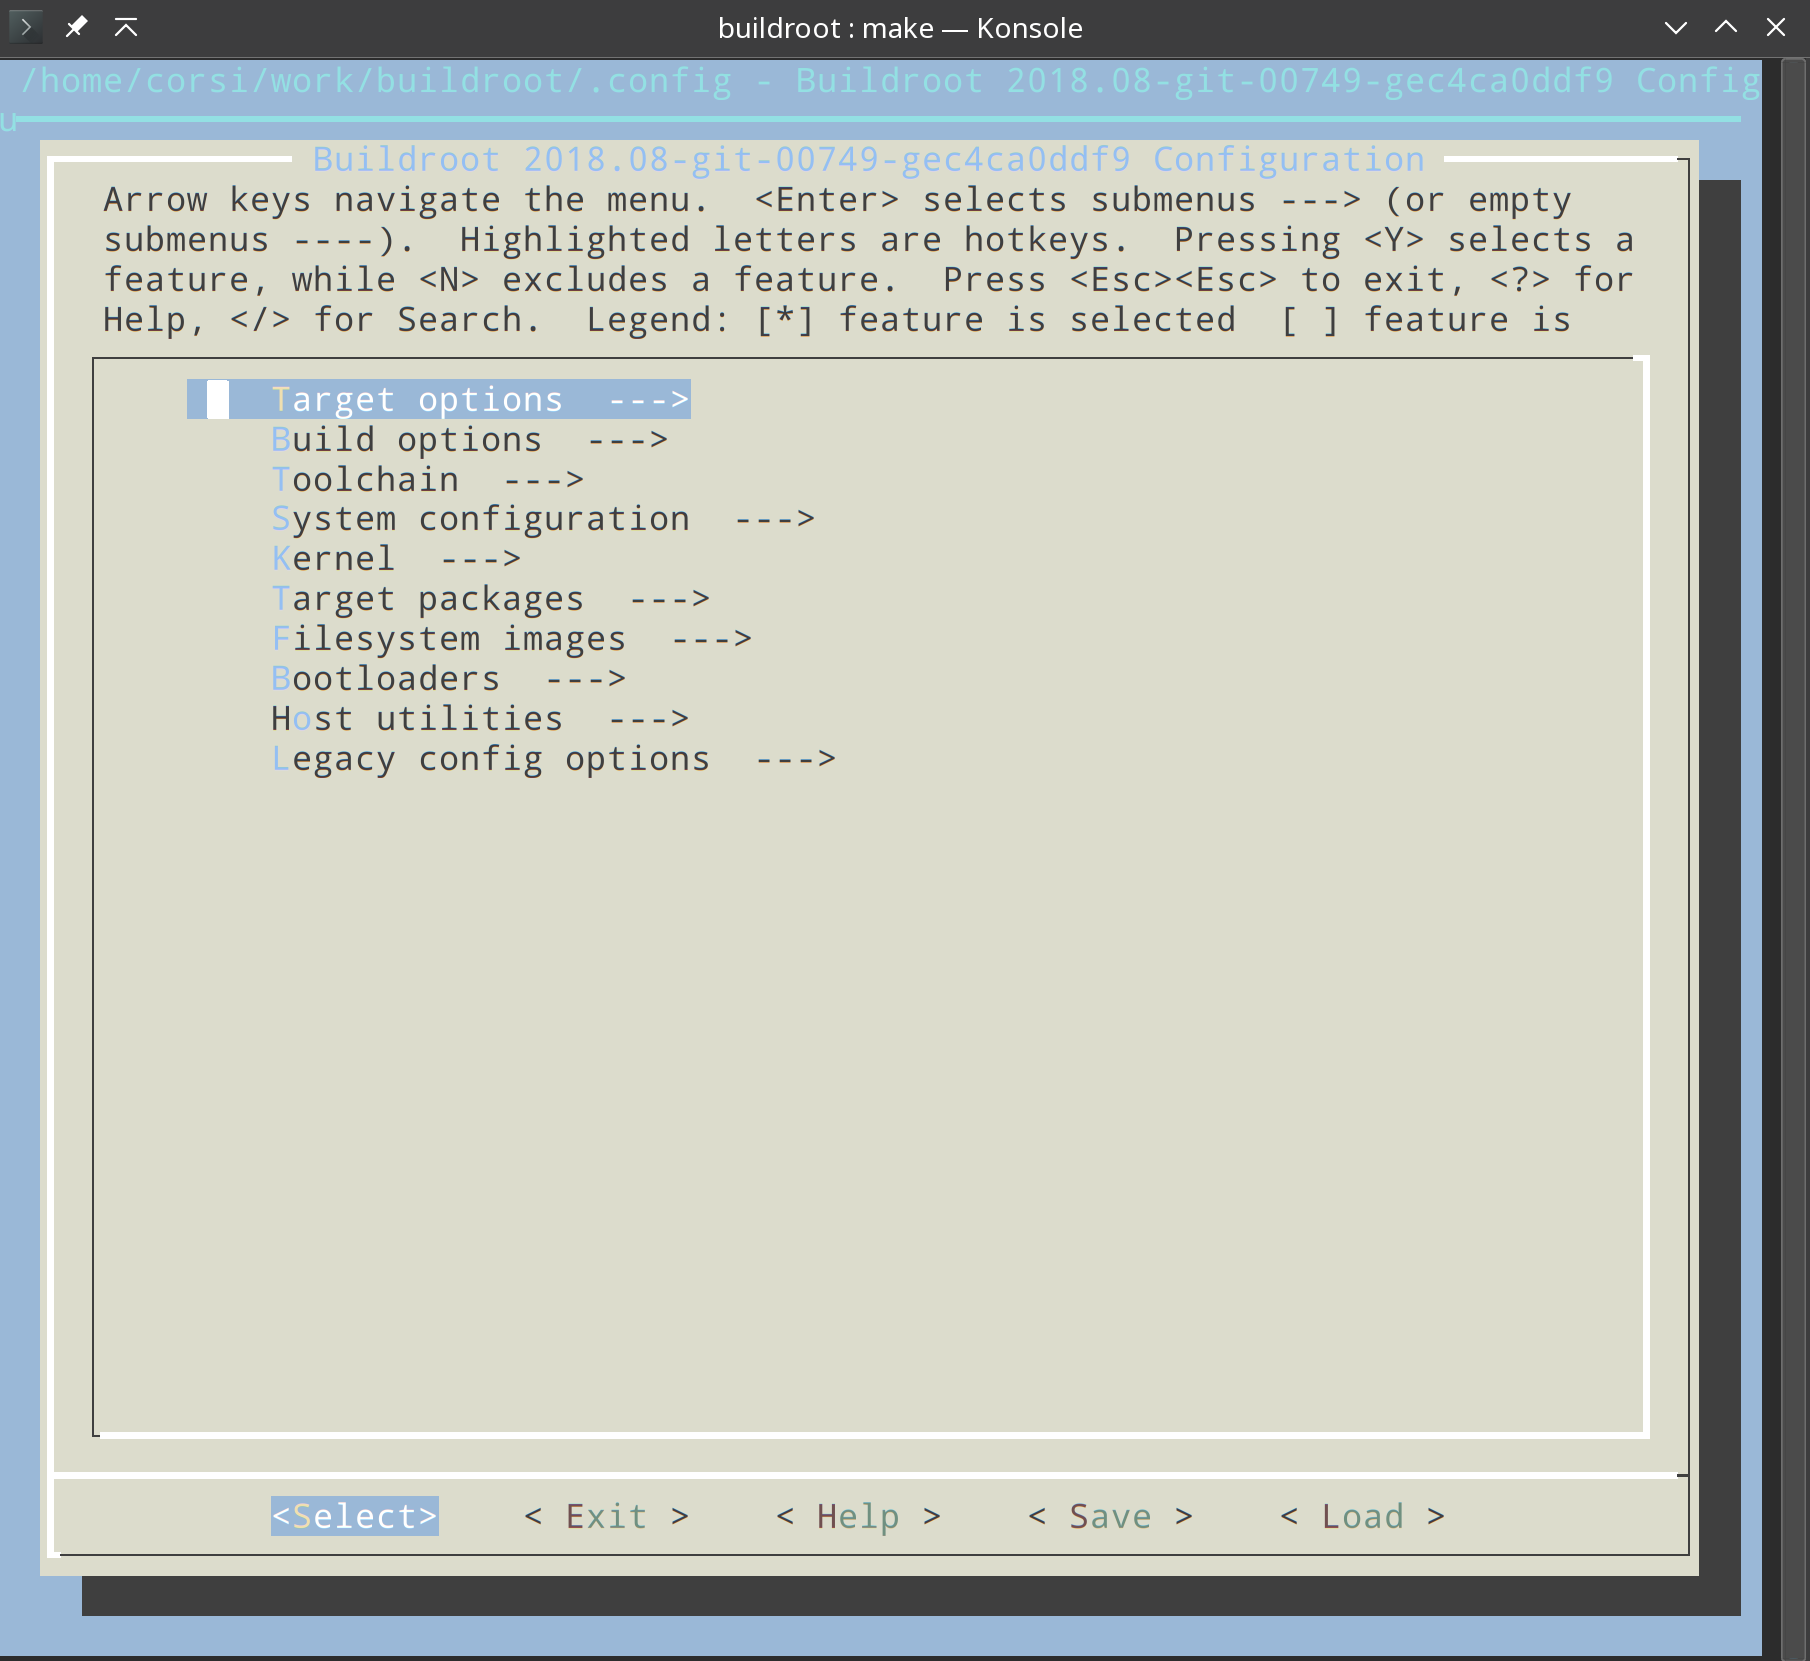
INFO
To return to this screen, simply press the <ESC> key twice.
1. Target Options
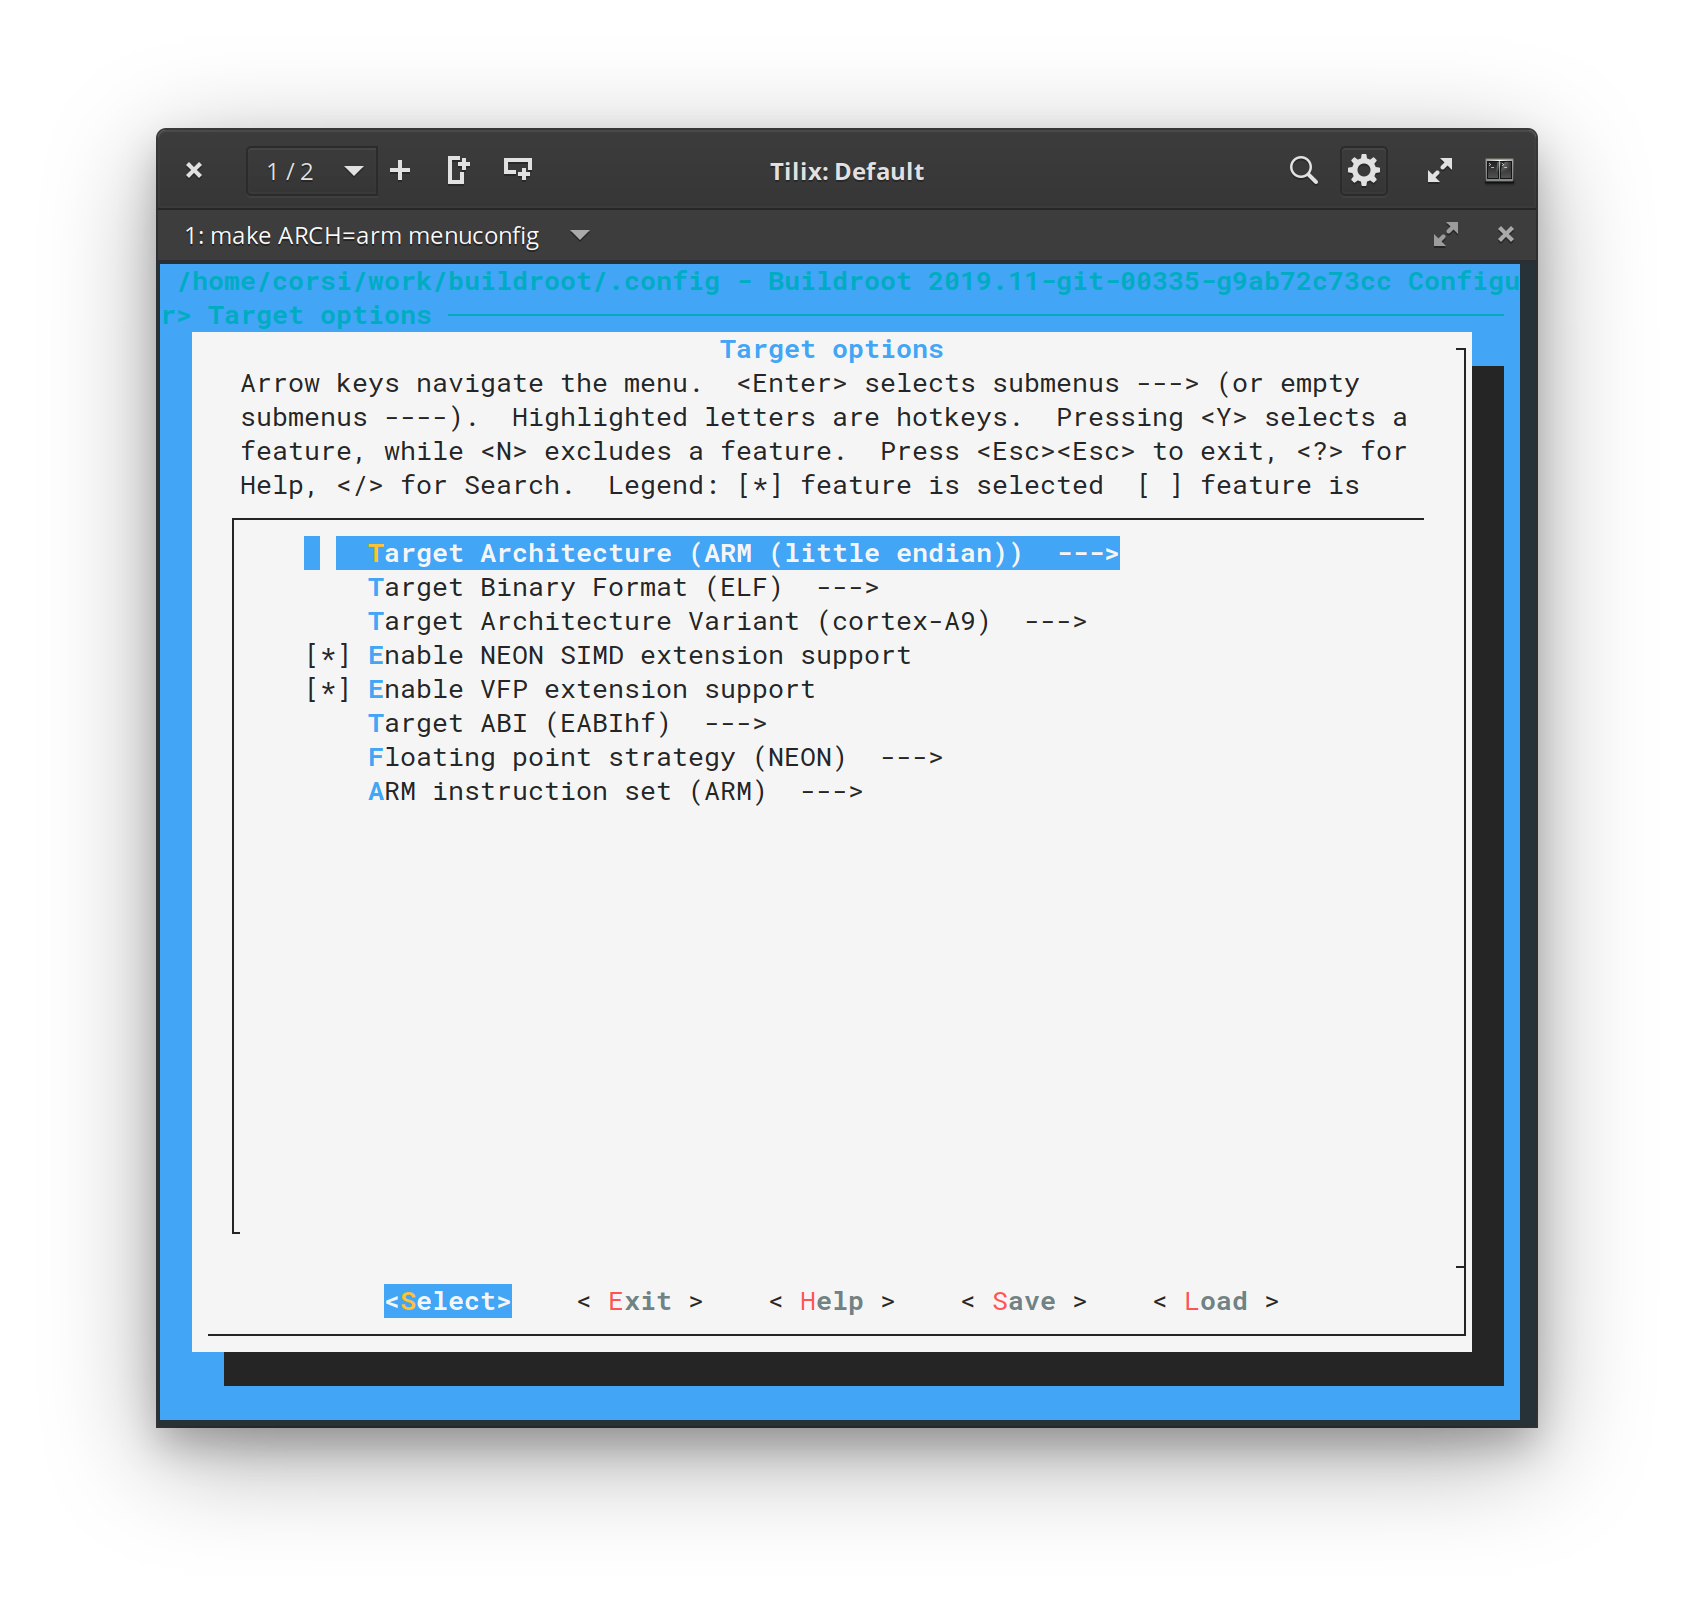
The first part we are going to configure is the target for generating the filesystem (Target options). We need to inform Buildroot that it is generating files for an ARM and indicate some options for our compiler:
Config
Main Menu ➡️ Target Options:
- Target Architecture: ARM (little endian)
- This option should already be correct since we passed it via the make call (make ARCH=ARM ...)
- Target Architecture Variant: cortex-A9
- Enable NEON SIMD extension support
- Enable VFP extension support
- Floating point strategy: NEON
- Target ABI: EABIhf
- We indicate to Buildroot that our architecture has floating point in HW.
Image
2. Build options
Config
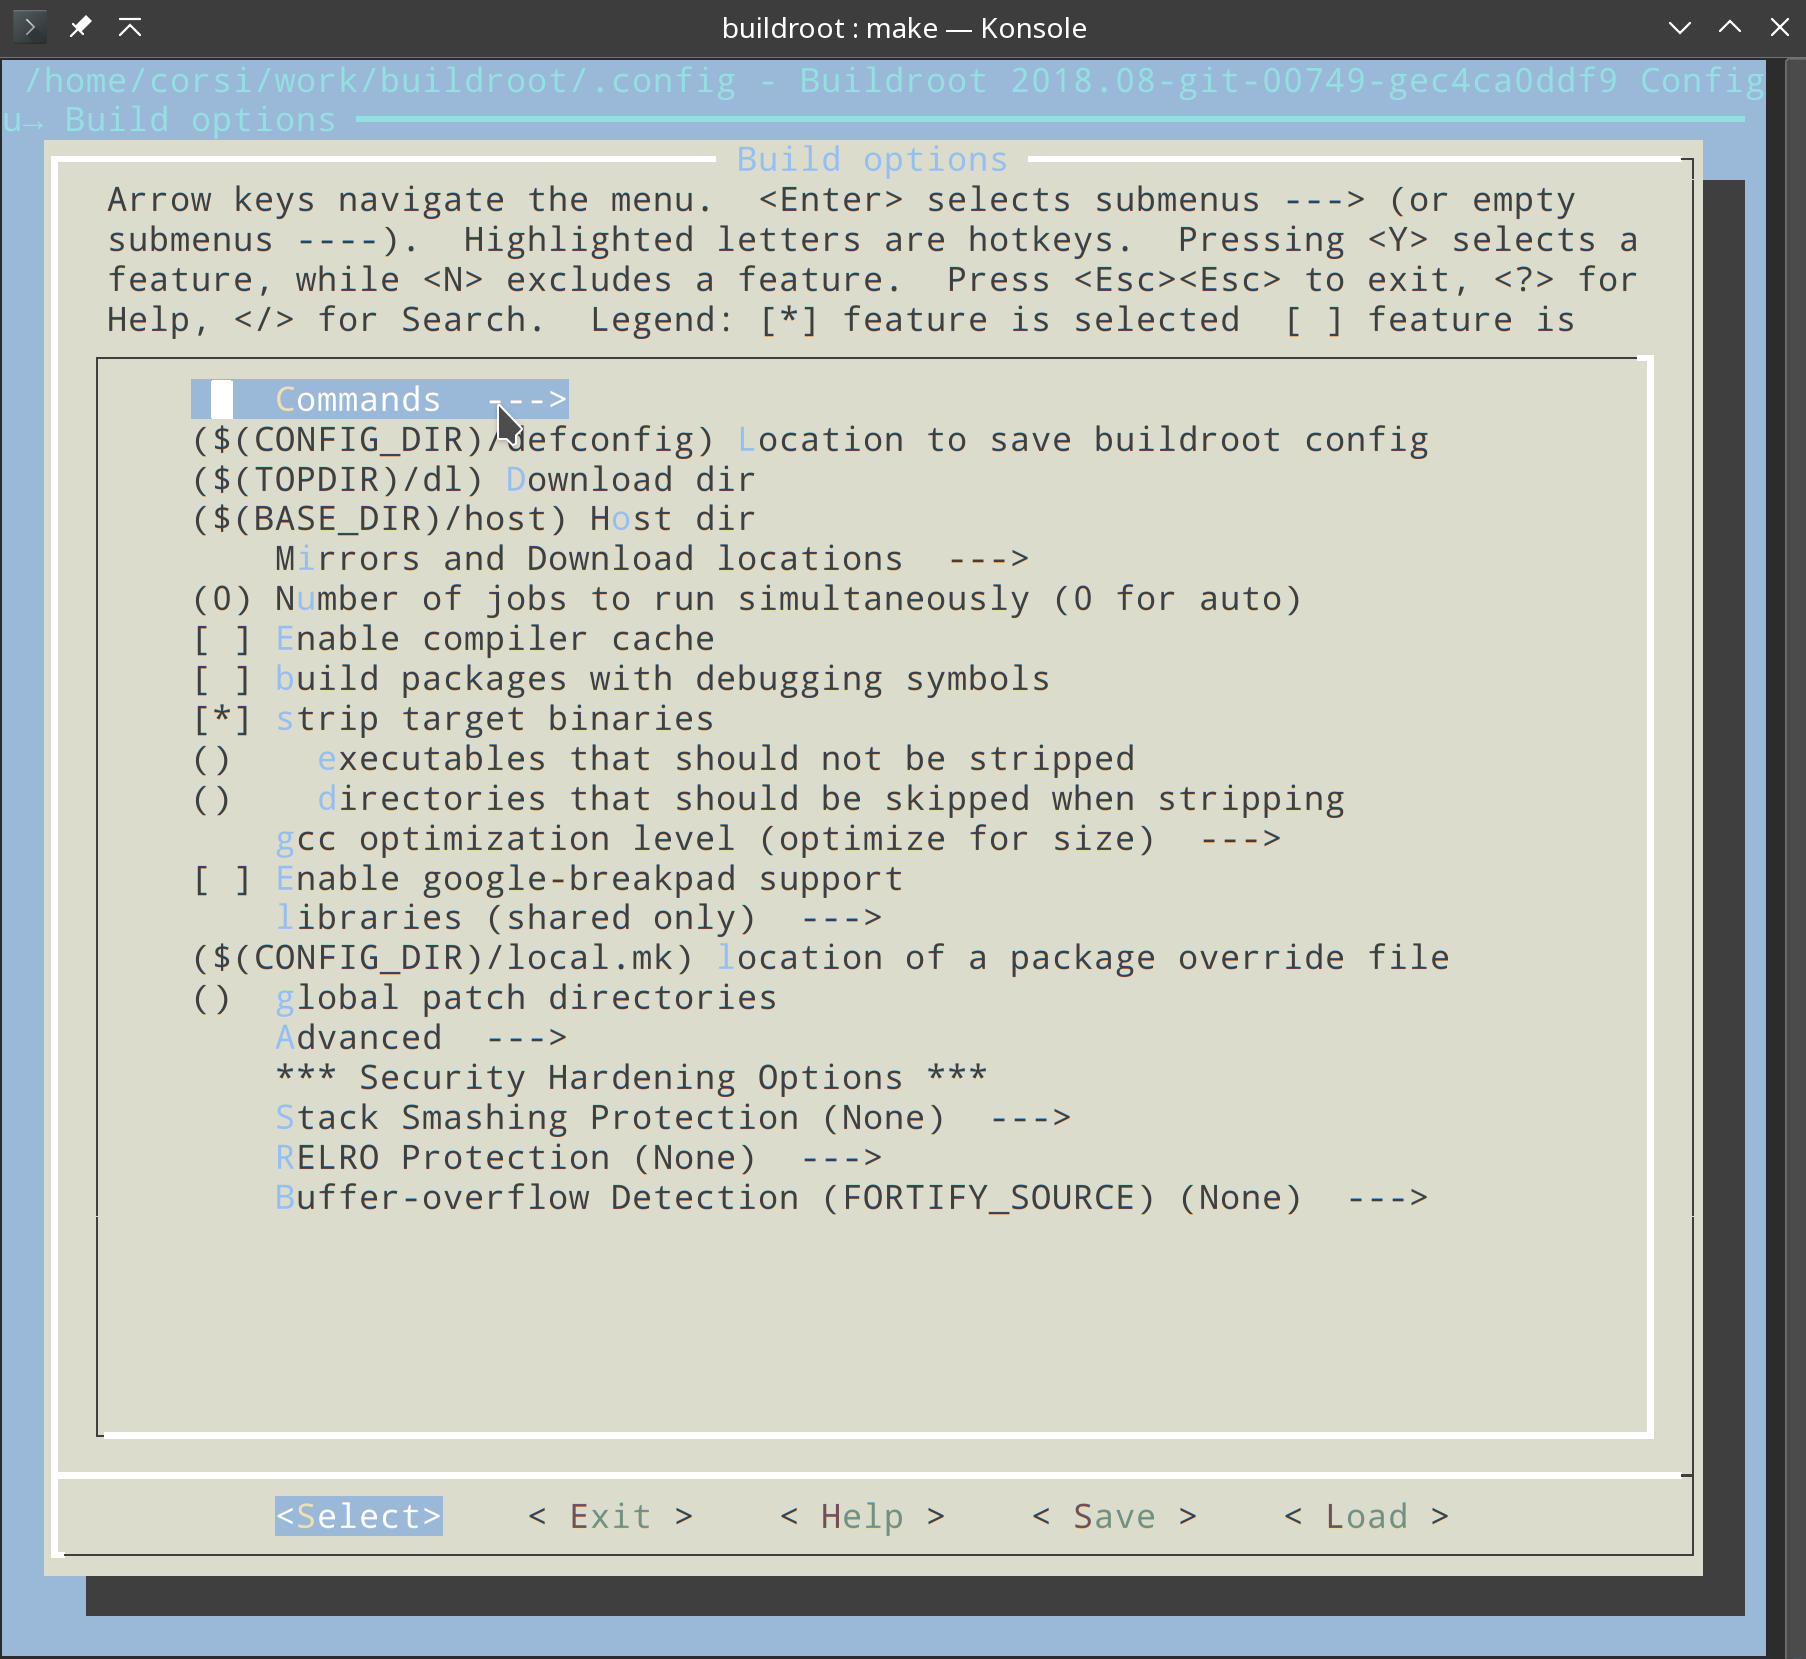
Main Menu ➡️ Build options:
- Leave this as the default.
Image
3. Toolchain
Config
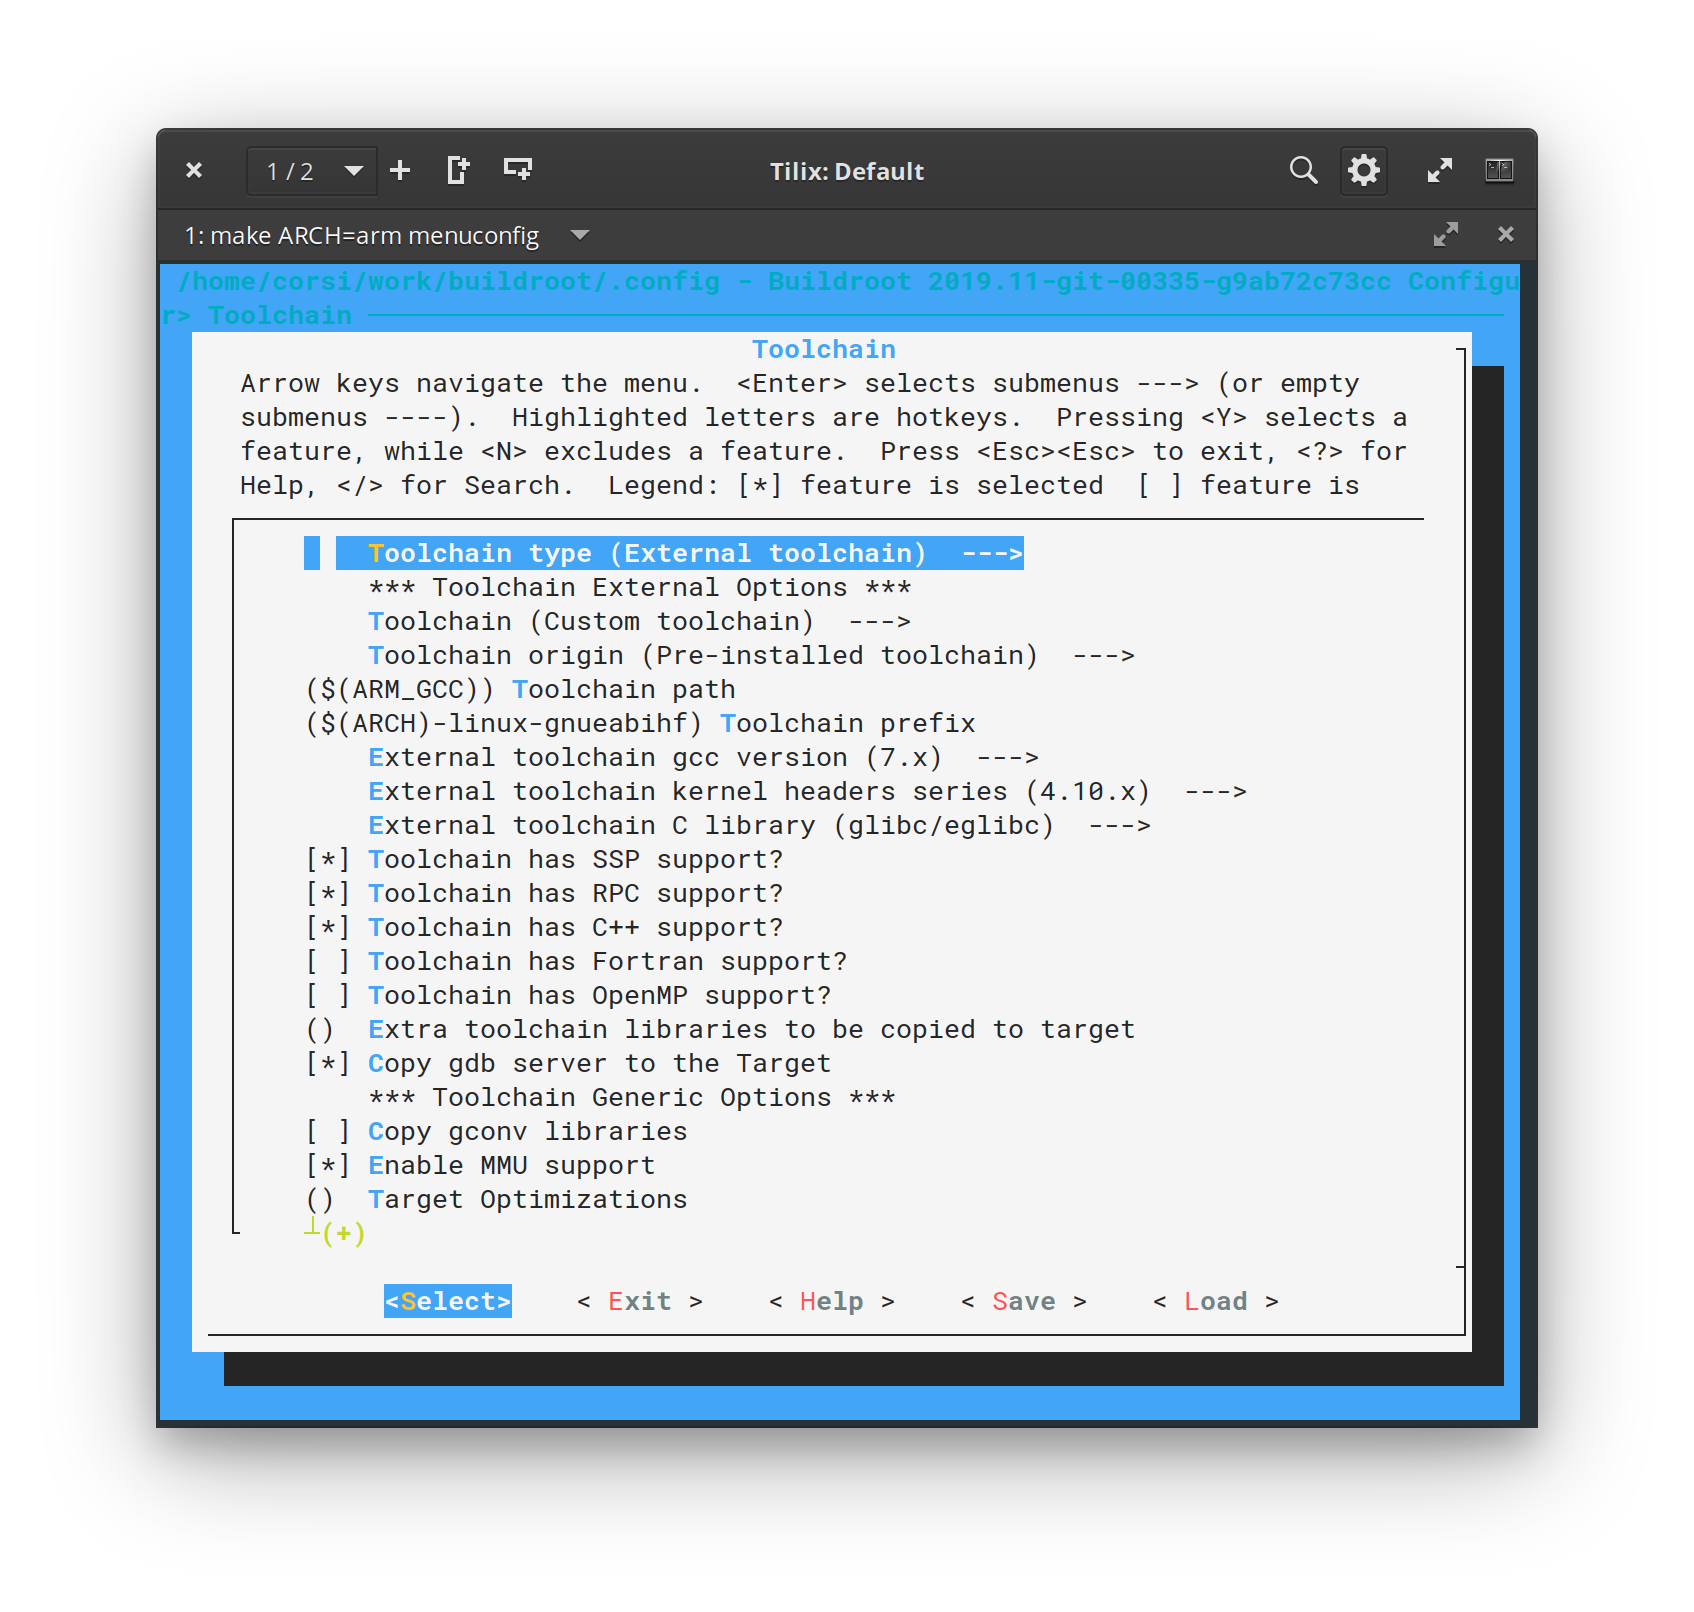
Now let's indicate to Buildroot which toolchain it should use and its configurations.
Pay special attention to each one of the fields, an error here will fail the build..
Main Menu ➡️ Toolchain:
- Toolchain type: External toolchain
- Buildroot will use the toolchain that we specify. Note that within this option is the Buildroot toolchain, which if activated would cause Buildroot to automatically download the entire toolchain.
- Toolchain: Custom toolchain
- Toolchain path: $(ARM_GCC)
- Buildroot will use this system variable as the path to the toolchain. We have two options here :
- We can declare this variable in bash
- We can edit this option with the path of our toolchain
- For now, let's choose option 1.
- Buildroot will use this system variable as the path to the toolchain. We have two options here :
- Toolchain prefix: $(ARCH)-linux-gnueabihf
- The prefix is how the toolchain will be called, for example to access gcc:
$(ARM_GCC)/bin/$(ARCH)-linux-gnueabihf-gcc- Being :
- ARM_GCC =
/home/corsi/work/gcc-linaro-7.2.1-2017.11-x86_64_arm-linux-gnueabihf - ARCH = arm (passed in the make call)
- ARM_GCC =
- Results in:
/home/corsi/work/gcc-linaro-7.1-2017.11-x86_64_arm-linux-gnueabihf/bin/arm-linux-gnueabihf-gcc
- The prefix is how the toolchain will be called, for example to access gcc:
- Toolchain gcc version: 7.x
- Toolchain kernel headers series: 4.10.x
- External toolchain C library: glibc/eglibc
- Activate: Toolchain has SSP support
- Activate: Toolchain has RCP support
- Activate: Toolchain has C++ support
Image
4. System Configuration
Config
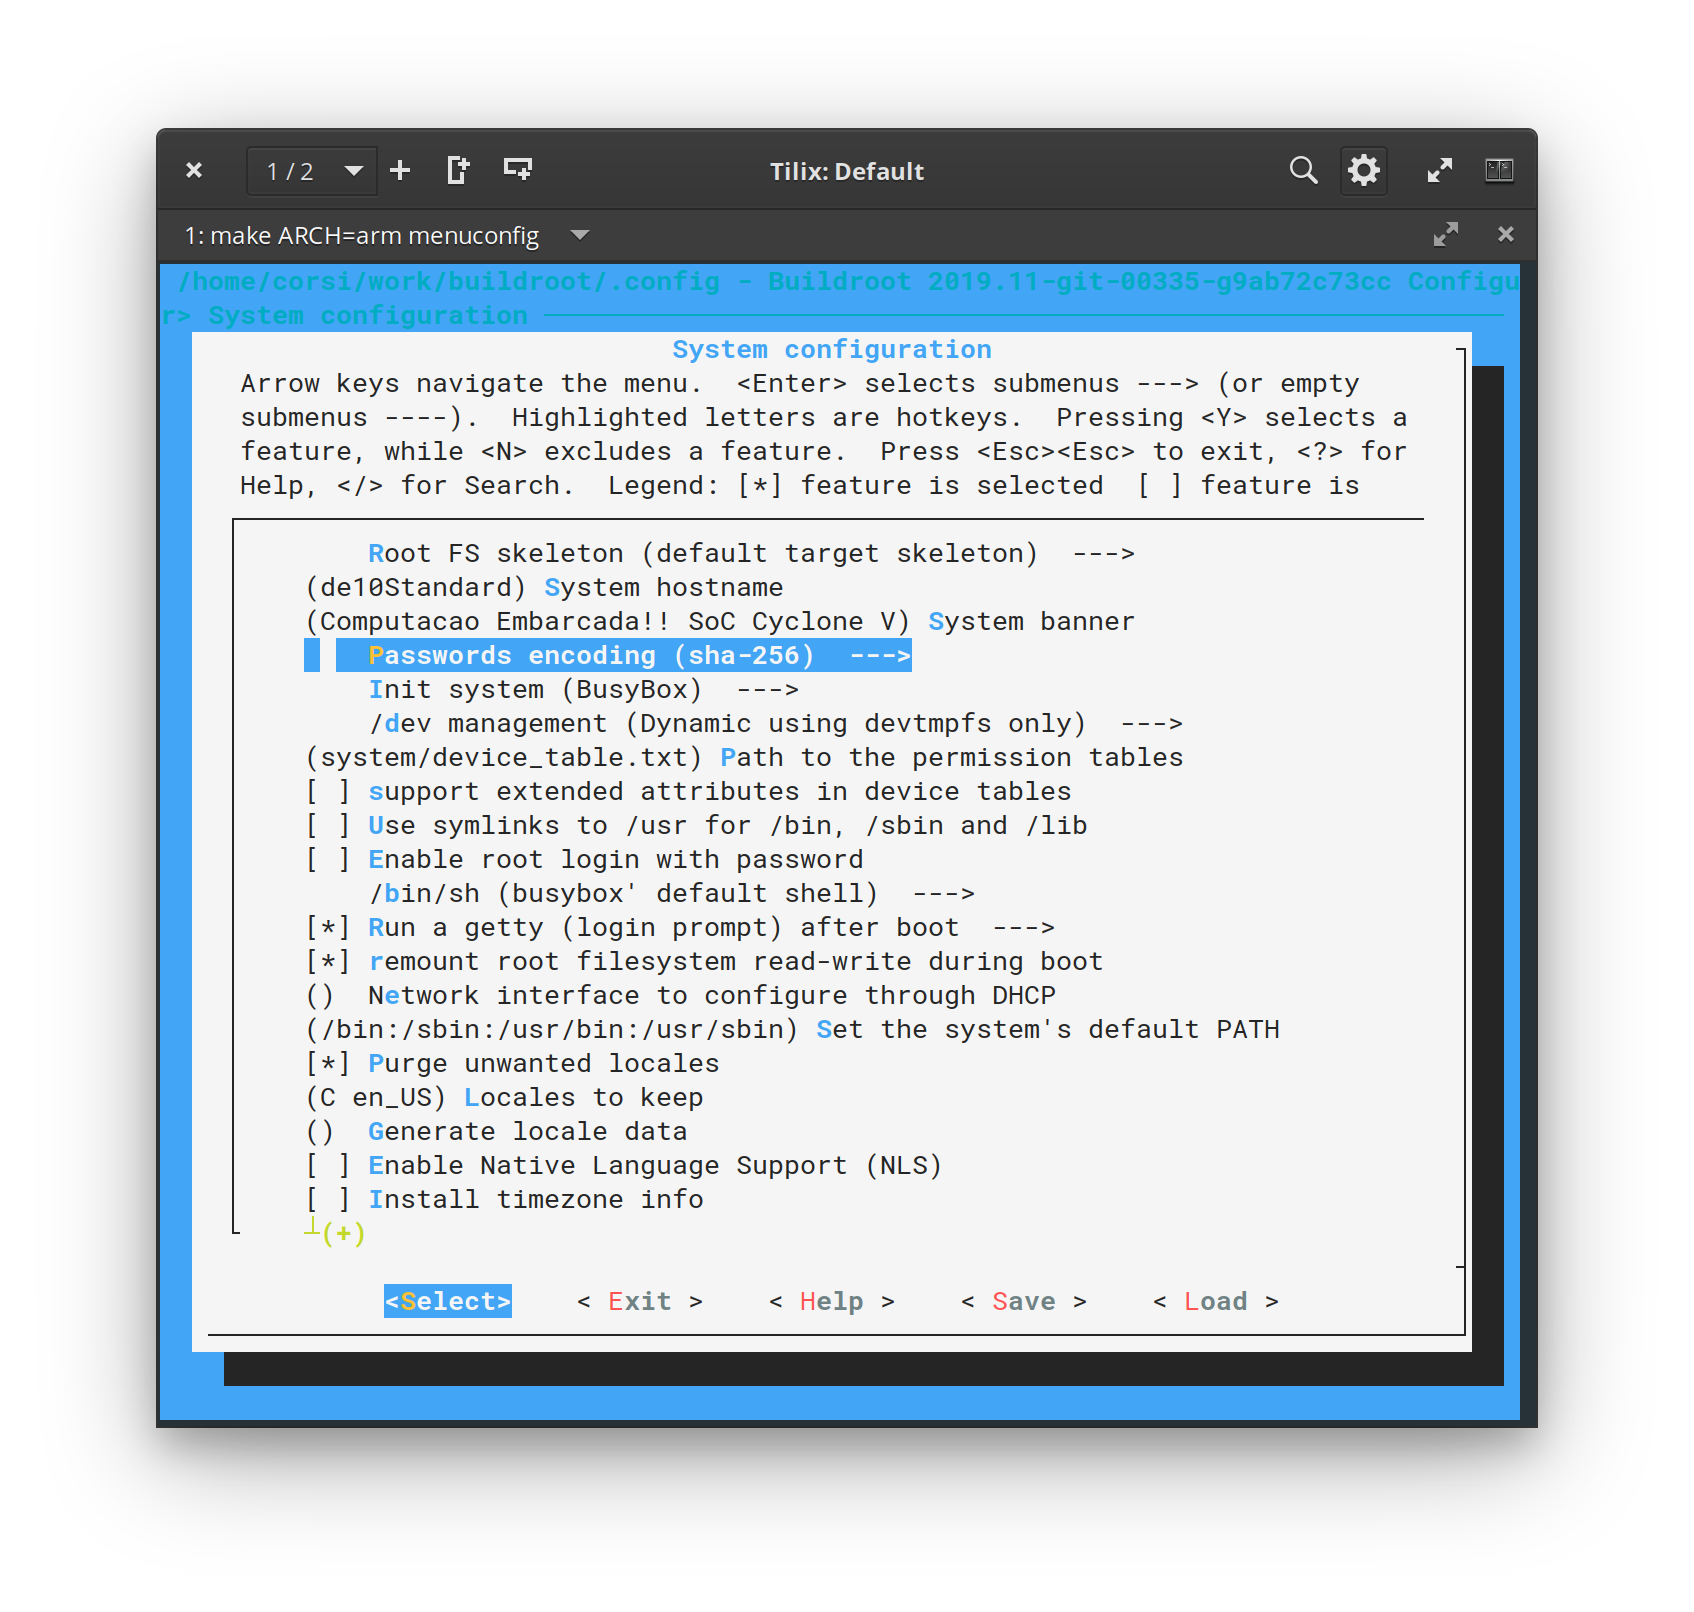
In this step, we will configure information such as: hostname, user, password, and init system...
Main Menu ➡️ System Configuration:
- System hostname: SoC-Corsi (choose whatever you prefer)
- System banner: Advanced Embedded Systems!! SoC Cyclone V
- Init system:
BusyBox
- systemd is an alternative, but it's more complex!
- Root password: 1234 (choose whatever you prefer)
- /bin/sh: busybox - The shell to be inserted into the system, we have several other options: bash, zsh. All of them will increase the size and complexity of the image.
Image
5. Kernel / bootloader
Busybox can download and compile the kernel and uboot for us.
Main Menu ➡️ Kernel
- We will not use this configuration. Leave unchecked!
6. Target packages
In this menu, we have the option of which programs and systems will be inserted into the image for the target. For example, if we want to insert a webserver (apache?) into our embedded Linux, we should select it here.
Let's leave it as the default for now. We will come back to this step later.
7. Filesystem images
Config
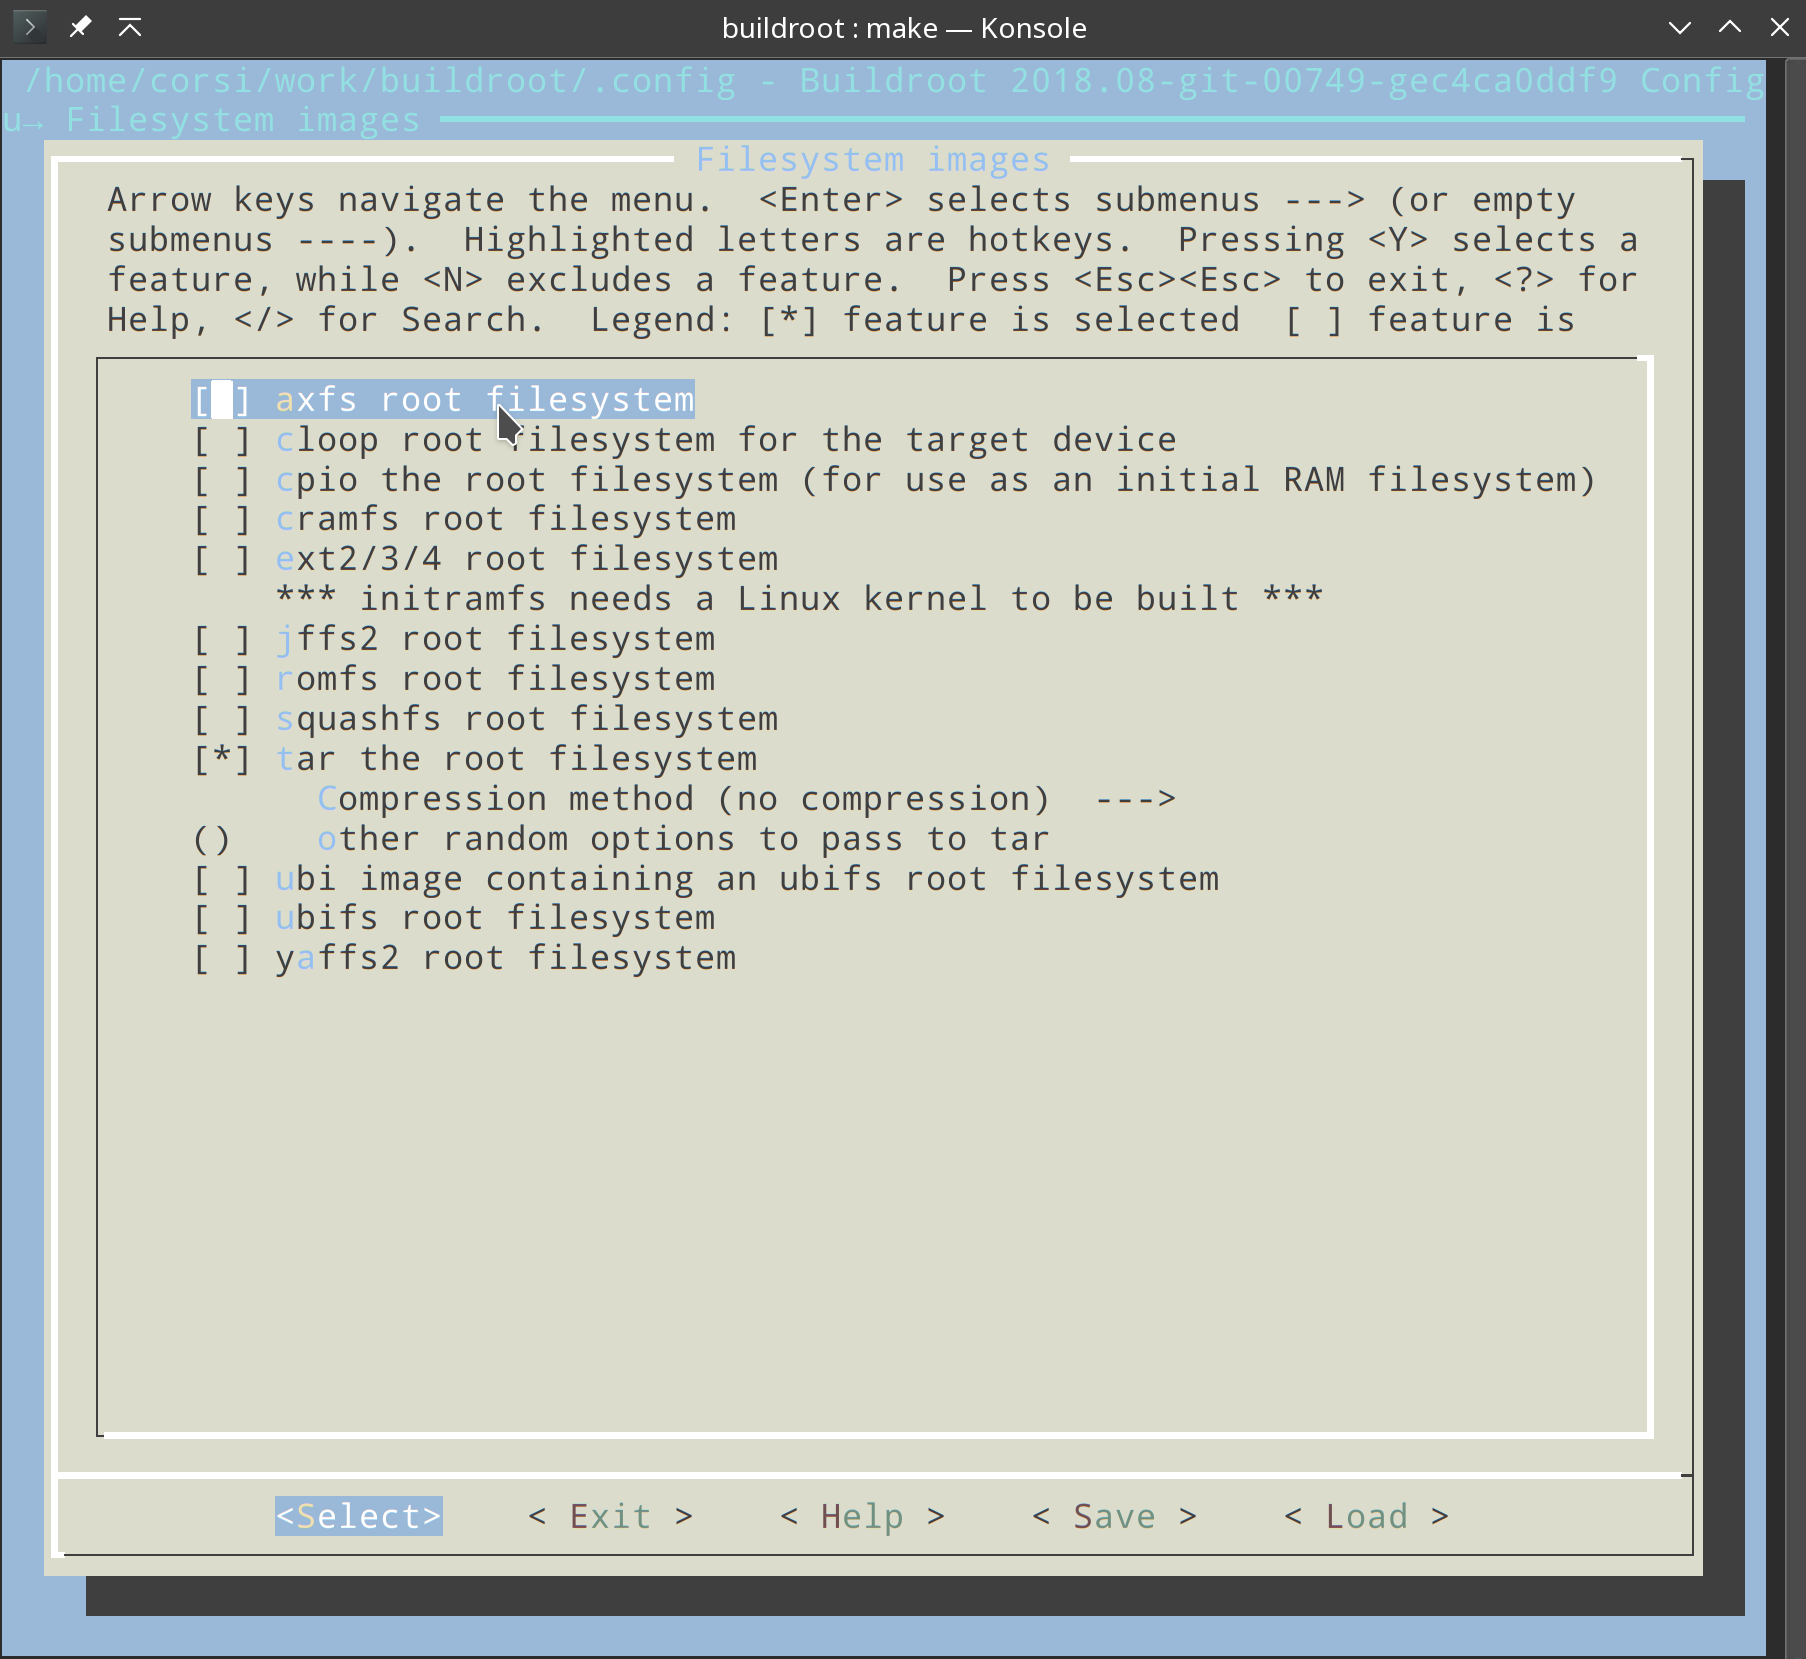
Main Menu ➡️ Filesystem images:
- Select: tar the root filesystem
This menu describes to Busybox how the final output of the generated filesystem image should be. Busybox needs to generate a filesystem that is capable of correctly configuring file permissions (it cannot simply generate a folder with all files and programs).
Image
Saving
Now we will save the configuration, this will create a .confg file on the directory, similar to the used by the Linux Kernel.
Exercise
- Configure build root as shown previous.
- Save your configuration (ESC ESC save) and return to the terminal. We will now generate the image of our filesystem.
Compiling
At this stage, Buildroot will download all the packages and programs that were selected in the configuration menu from the web, and will compile the source code with the toolchain that we provided. This can take some time because it depends to download all sources files and build all programs.
Exercise
To compile and generate the filesystem run:
bash
$ make ARCH=arm all -j 4This can take some time.
Graphics!
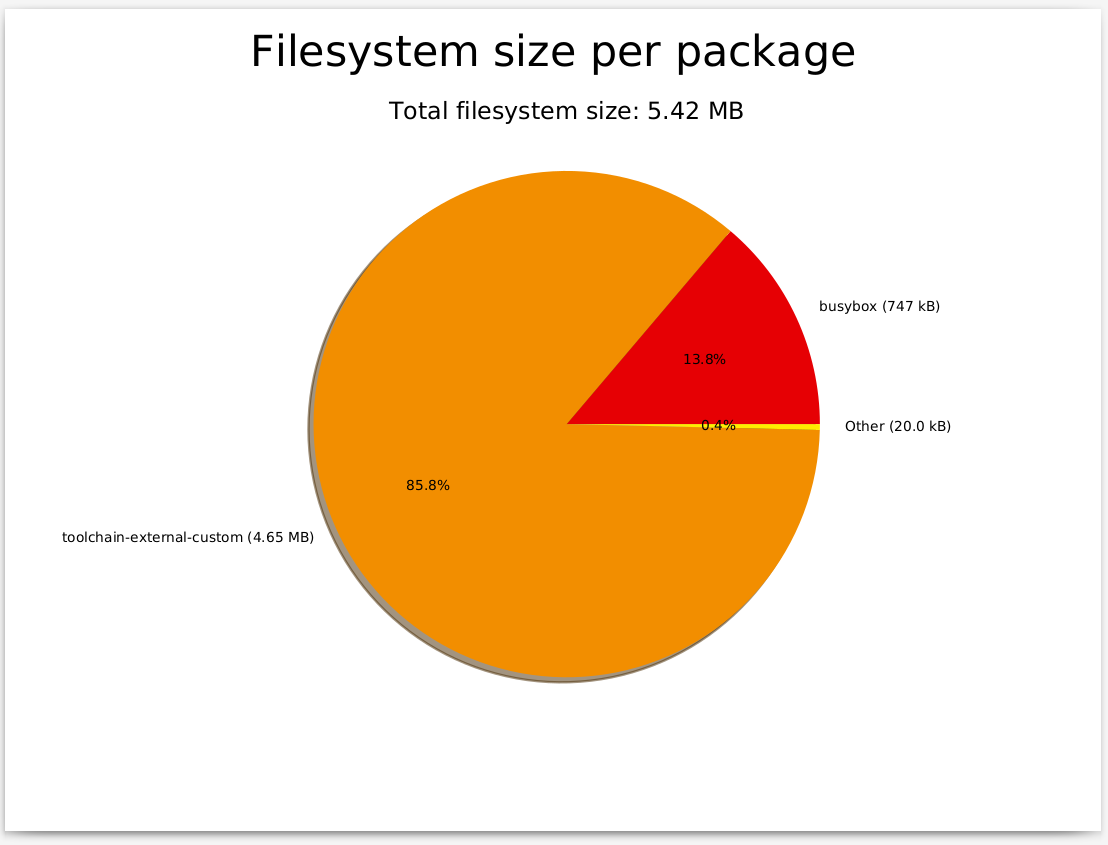
Once the FS generation process is finished, we can generate some very important graphics:
Package dependencies:
make graph-dependsCompilation time:
make graph-buildContribution of each package to FS size:
make graph-size
The graphs are saved in the folder: output/graphs/, you should obtain something similar tool:
Exercises
- Install the dependencies
bash
sudo apt install graphviz python-matplotlib python-numpy- Generate the three graphs and analyze the results
Outputs
There are two outputs of Buildroot in the folder: buildroot/output/**
- The file
./images/rootfs.tar: which contains the target fileSystem (with the correct permissions) - The folder
./images/target/: with the files contained in the.tarbut without the correct permissions to run on the target. In fact, this folder contains a file:
**THIS_IS_NOT_YOUR_ROOT_FILESYSTEM**

Warning!

This directory does *not* contain the root filesystem that you can use on your embedded system.
Since Buildroot does not run as root, it cannot create device files and set the permissions and
ownership of files correctly in this directory to make it usable as a root filesystem.
Testing
To test on our embedded systems, we need to extract the rootfs.tar file to our memory card.
Exercise
Follow the tutorial at SDCard - FileSystem where there is explained how to extract the rootfs.tar to our memory card.
short
Did the boot become faster?
Studying
Some suggestion to explore and learn more!
- Describe what is the root file system
- Research about initd process
- What is the purpose of
/linuxrcand how does it work - What is the purpose of
/proc
References
- dtb: https://rocketboards.org/foswiki/Documentation/HOWTOCreateADeviceTree
- Generating and Compiling the Preloader: https://rocketboards.org/foswiki/Documentation/GSRD141Preloader
- Compiling the kernel: https://rocketboards.org/foswiki/Documentation/EmbeddedLinuxBeginnerSGuide#8